apprendista
-
Numero contenuti
270 -
Iscritto
-
Ultima visita
Tipo di contenuto
Profili
Articoli
Introduzione alla stampa 3D
Database materiali
Forum
Calendario
Blogs
Gallery
Download
Store
Tutti i contenuti di apprendista
-
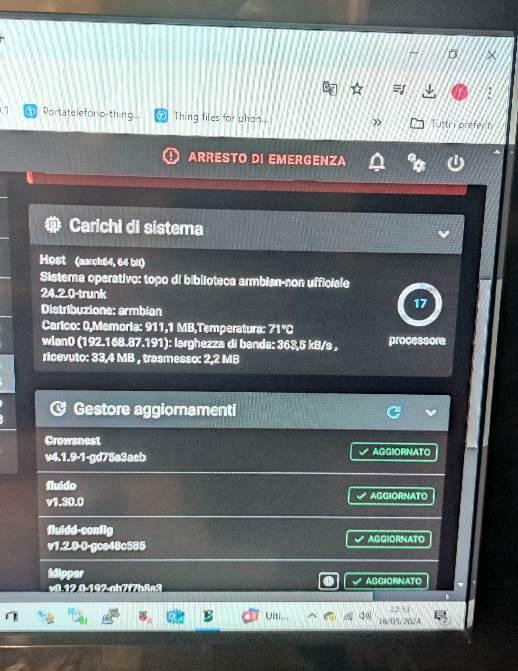
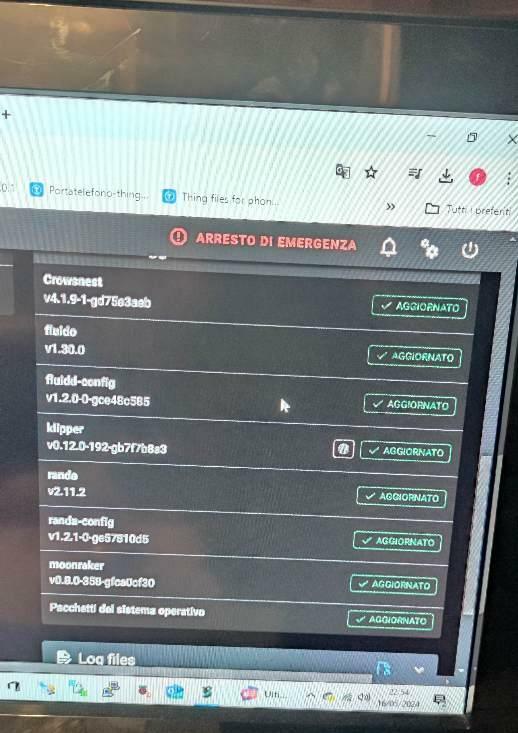
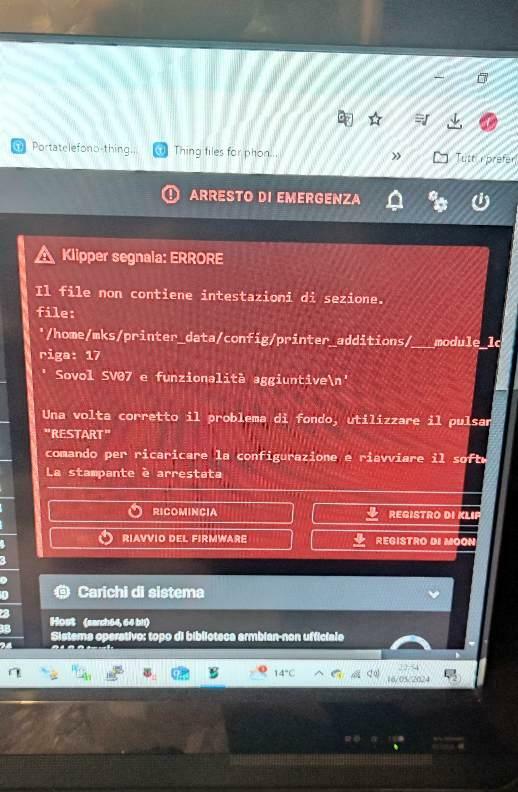
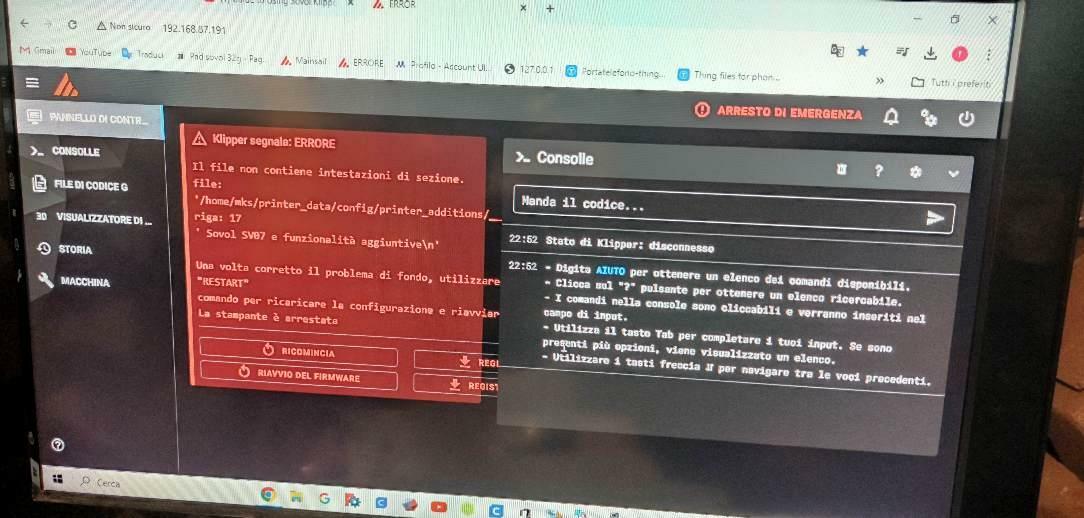
Pad sovol 32g
apprendista ha risposto a apprendista nella discussione Software di slicing, firmware e GCode
sovol 07 + con piatto 300x300 -
Pad sovol 32g
apprendista ha risposto a apprendista nella discussione Software di slicing, firmware e GCode
Il mio printer.cfg come è nominato ? E come lo devo nominare per averne due uguali ? -
Pad sovol 32g
apprendista ha risposto a apprendista nella discussione Software di slicing, firmware e GCode
E questo ho scaricato, non ricordo neanche come, per cambiarlo come si può fare ? Comunque lo ha sempre dato il messaggio rosso ,solo ogni tanto era azzurro. -
Pad sovol 32g
apprendista ha risposto a apprendista nella discussione Software di slicing, firmware e GCode
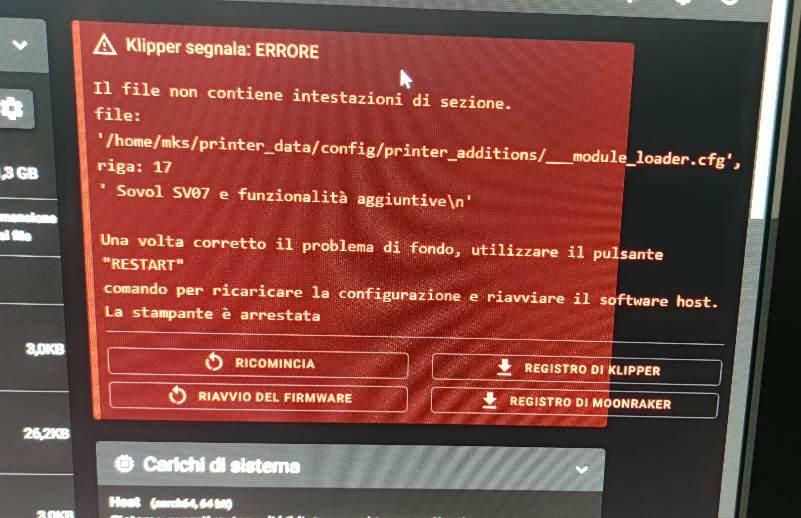
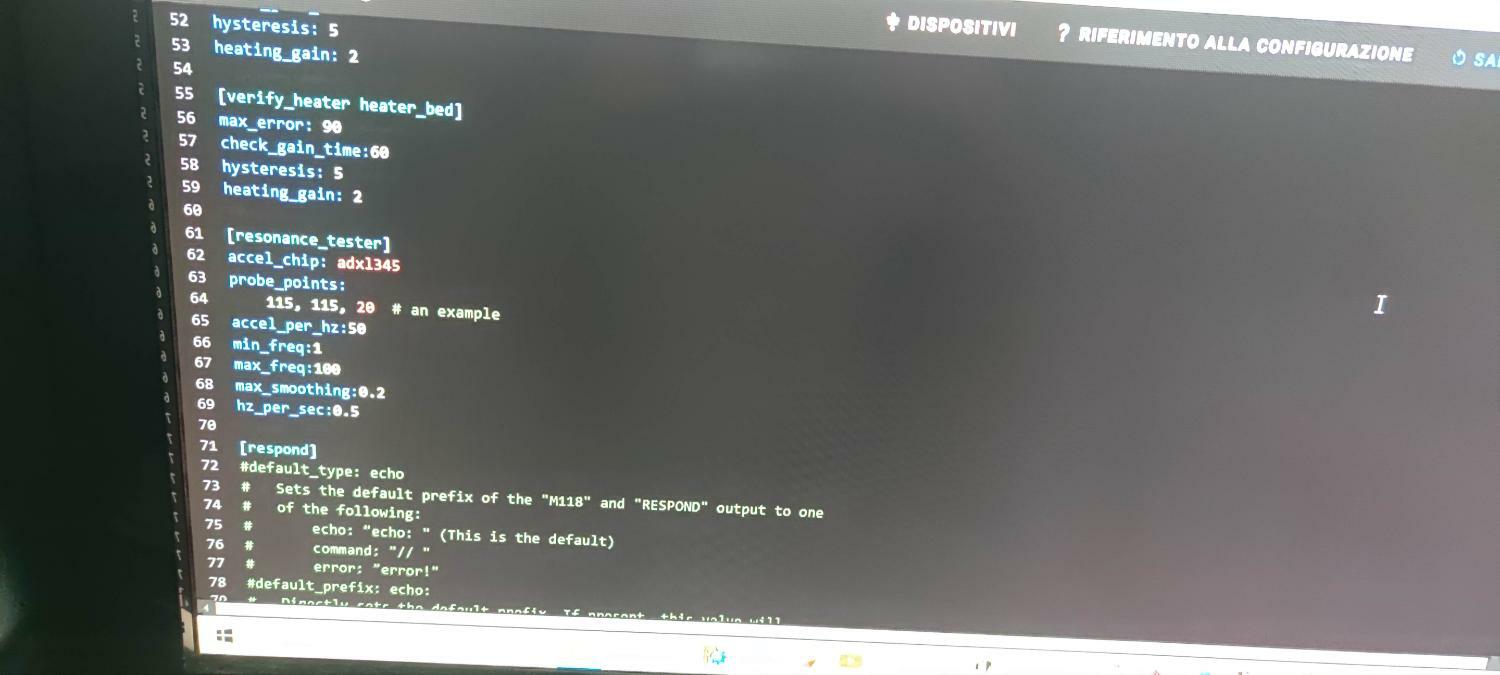
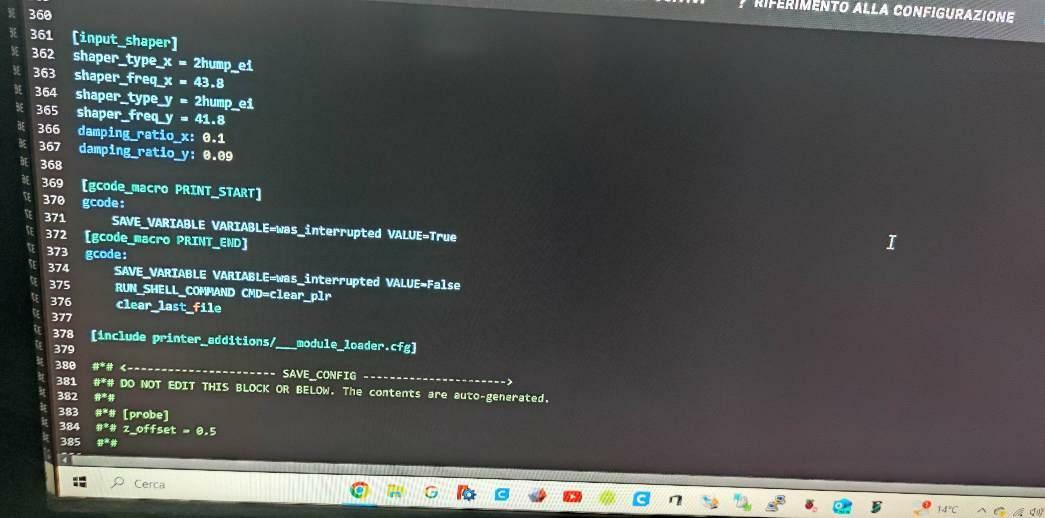
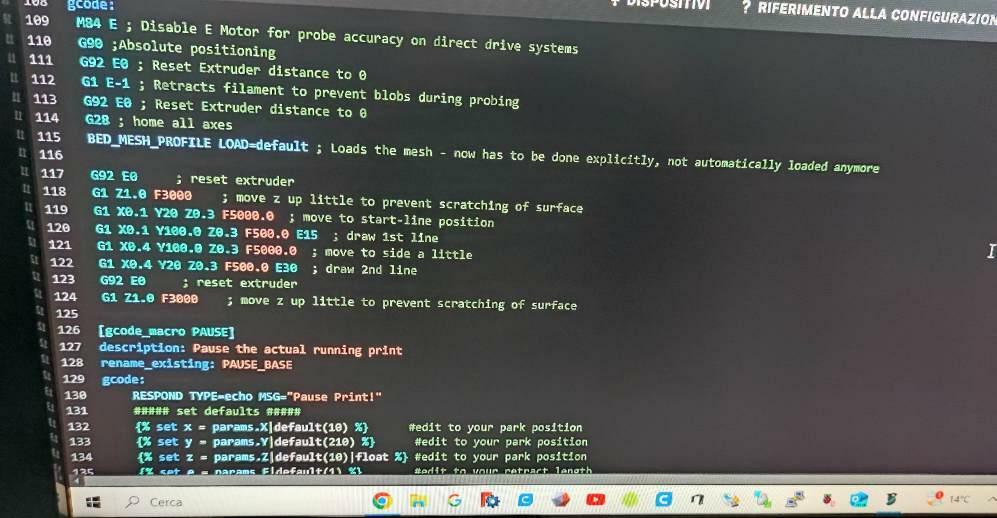
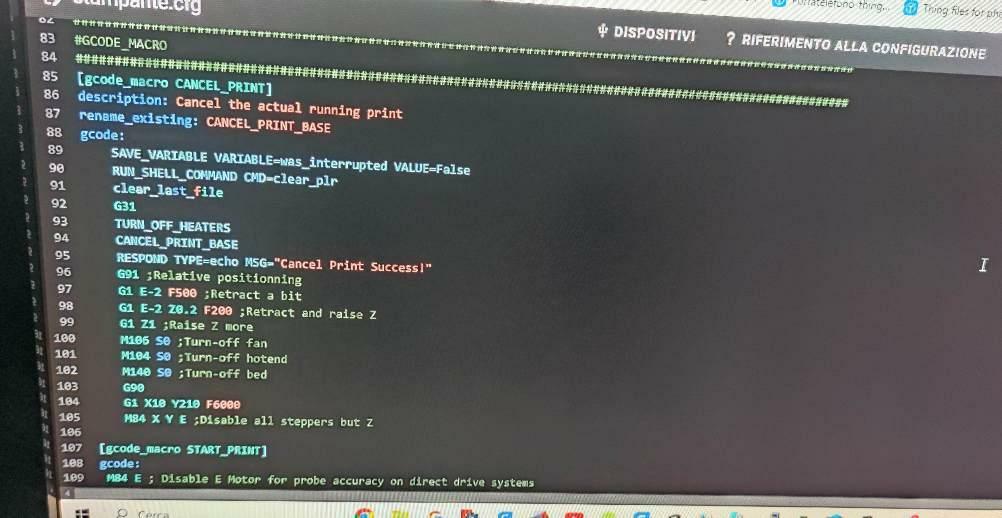
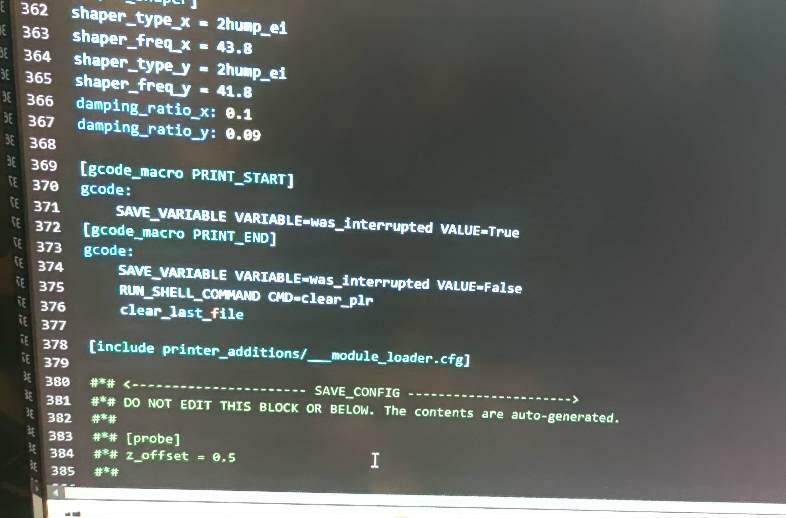
#To use this config, during "make menuconfig" select the # STM32F103 with a "28KiB bootloader" and serial (on USART1 PA10/PA9) # communication. # If you prefer a direct serial connection, in "make menuconfig" # select "Enable extra low-level configuration options" and select # serial (on USART3 PB11/PB10), which is broken out on the 10 pin IDC # cable used for the LCD module as follows: # 3: Tx, 4: Rx, 9: GND, 10: VCC # See docs/Config_Reference.md for a description of parameters. [include plr.cfg] [mcu] serial:/dev/serial/by-id/usb-1a86_USB_Serial-if00-port0 restart_method: command [printer] kinematics: cartesian max_velocity: 300 max_accel: 8000 max_accel_to_decel:4500 max_z_velocity: 15 max_z_accel: 150 square_corner_velocity:3.0 [virtual_sdcard] path:/home/mks/printer_data/gcodes [pause_resume] [display_status] [idle_timeout] gcode: RESPOND TYPE=echo MSG="No operations in 10min!" # A list of G-Code commands to execute on an idle timeout. See # docs/Command_Templates.md for G-Code format. The default is to run # "TURN_OFF_HEATERS" and "M84". timeout: 600 [mcu rpi] serial: /tmp/klipper_host_mcu [adxl345] cs_pin: rpi:None spi_bus: spidev0.0 [verify_heater extruder] max_error: 60 check_gain_time:20 hysteresis: 5 heating_gain: 2 [verify_heater heater_bed] max_error: 90 check_gain_time:60 hysteresis: 5 heating_gain: 2 [resonance_tester] accel_chip: adxl345 probe_points: 115, 115, 20 # an example accel_per_hz:50 min_freq:1 max_freq:100 max_smoothing:0.2 hz_per_sec:0.5 [respond] #default_type: echo # Sets the default prefix of the "M118" and "RESPOND" output to one # of the following: # echo: "echo: " (This is the default) # command: "// " # error: "error!" #default_prefix: echo: # Directly sets the default prefix. If present, this value will # override the "default_type". ############################################################################################################# #GCODE_MACRO ############################################################################################################# [gcode_macro CANCEL_PRINT] description: Cancel the actual running print rename_existing: CANCEL_PRINT_BASE gcode: SAVE_VARIABLE VARIABLE=was_interrupted VALUE=False RUN_SHELL_COMMAND CMD=clear_plr clear_last_file G31 TURN_OFF_HEATERS CANCEL_PRINT_BASE RESPOND TYPE=echo MSG="Cancel Print Success!" G91 ;Relative positionning G1 E-2 F500 ;Retract a bit G1 E-2 Z0.2 F200 ;Retract and raise Z G1 Z1 ;Raise Z more M106 S0 ;Turn-off fan M104 S0 ;Turn-off hotend M140 S0 ;Turn-off bed G90 G1 X10 Y210 F6000 M84 X Y E ;Disable all steppers but Z [gcode_macro START_PRINT] gcode: M84 E ; Disable E Motor for probe accuracy on direct drive systems G90 ;Absolute positioning G92 E0 ; Reset Extruder distance to 0 G1 E-1 ; Retracts filament to prevent blobs during probing G92 E0 ; Reset Extruder distance to 0 G28 ; home all axes BED_MESH_PROFILE LOAD=default ; Loads the mesh - now has to be done explicitly, not automatically loaded anymore G92 E0 ; reset extruder G1 Z1.0 F3000 ; move z up little to prevent scratching of surface G1 X0.1 Y20 Z0.3 F5000.0 ; move to start-line position G1 X0.1 Y100.0 Z0.3 F500.0 E15 ; draw 1st line G1 X0.4 Y100.0 Z0.3 F5000.0 ; move to side a little G1 X0.4 Y20 Z0.3 F500.0 E30 ; draw 2nd line G92 E0 ; reset extruder G1 Z1.0 F3000 ; move z up little to prevent scratching of surface [gcode_macro PAUSE] description: Pause the actual running print rename_existing: PAUSE_BASE gcode: RESPOND TYPE=echo MSG="Pause Print!" ##### set defaults ##### {% set x = params.X|default(10) %} #edit to your park position {% set y = params.Y|default(210) %} #edit to your park position {% set z = params.Z|default(10)|float %} #edit to your park position {% set e = params.E|default(1) %} #edit to your retract length ##### calculate save lift position ##### {% set max_z = printer.toolhead.axis_maximum.z|float %} {% set act_z = printer.toolhead.position.z|float %} {% set lift_z = z|abs %} {% if act_z < (max_z - lift_z) %} {% set z_safe = lift_z %} {% else %} {% set z_safe = max_z - act_z %} {% endif %} ##### end of definitions ##### PAUSE_BASE G91 {% if printer.extruder.can_extrude|lower == 'true' %} G1 E-{e} F500 {% else %} {action_respond_info("Extruder not hot enough")} {% endif %} {% if "xyz" in printer.toolhead.homed_axes %} G1 Z{z_safe} G90 G1 X{x} Y{y} F6000 {% else %} {action_respond_info("Printer not homed")} {% endif %} [gcode_macro RESUME] description: Resume the actual running print rename_existing: RESUME_BASE gcode: RESPOND TYPE=echo MSG="RESUME Print!" ##### set defaults ##### {% set e = params.E|default(1) %} #edit to your retract length #### get VELOCITY parameter if specified #### {% if 'VELOCITY' in params|upper %} {% set get_params = ('VELOCITY=' + params.VELOCITY) %} {%else %} {% set get_params = "" %} {% endif %} ##### end of definitions ##### G91 {% if printer.extruder.can_extrude|lower == 'true' %} G1 E{e} F400 {% else %} {action_respond_info("Extruder not hot enough")} {% endif %} RESUME_BASE {get_params} [gcode_macro END_PRINT] gcode: G91 ;Relative positionning G1 E-2 F500 ;Retract a bit G1 E-2 Z0.2 F200 ;Retract and raise Z G1 X5 Y5 F3000 ;Wipe out G1 Z1 ;Raise Z more M106 S0 ;Turn-off fan M104 S0 ;Turn-off hotend M140 S0 ;Turn-off bed G90 ;Absolute positionning G1 X10 Y210 ;Present print M84 X Y E ;Disable all steppers but Z RESPOND TYPE=echo MSG="Finish Print!" [gcode_macro LOAD_FILAMENT] gcode: G91 G1 E30 F300 G1 E10 F150 G90 [gcode_macro UNLOAD_FILAMENT] gcode: G91 G1 E-30 F300 G90 [gcode_macro LED_ON] gcode: SET_PIN PIN=my_led VALUE=1 [gcode_macro LED_OFF] gcode: SET_PIN PIN=my_led VALUE=0 [gcode_macro M205] gcode: M105 ############################################################################################################# #stepper,TMC2209 ############################################################################################################# [stepper_x] step_pin: PC2 dir_pin: !PB9 enable_pin: !PC3 microsteps: 16 rotation_distance: 40 endstop_pin: tmc2209_stepper_x: virtual_endstop homing_retract_dist: 0 position_endstop: 0 position_min: 0 position_max: 225 homing_speed: 90 step_pulse_duration:0.000002 [tmc2209 stepper_x] uart_pin:PC1 run_current:1.1 uart_address:3 interpolate: True driver_sgthrs: 115 stealthchop_threshold: 999999 diag_pin: ^PA5 [stepper_y] step_pin: PB8 dir_pin:PB7 enable_pin: !PC3 microsteps: 16 rotation_distance: 40 endstop_pin: tmc2209_stepper_y: virtual_endstop homing_retract_dist: 0 position_endstop: 0 position_min: 0 position_max: 227 homing_speed: 60 step_pulse_duration:0.000002 [tmc2209 stepper_y] uart_pin:PC0 run_current:1.1 uart_address:3 interpolate: True driver_sgthrs: 85 stealthchop_threshold: 999999 diag_pin: ^PA6 [stepper_z] step_pin: PB6 dir_pin: !PB5 enable_pin: !PC3 microsteps: 16 rotation_distance: 4 endstop_pin:probe:z_virtual_endstop #position_endstop: 0.0 position_max: 260 position_min: -3 homing_speed:6 [extruder] max_extrude_only_distance: 100.0 step_pin: PB4 dir_pin: !PB3 enable_pin: !PC3 microsteps: 16 rotation_distance: 4.59 nozzle_diameter: 0.400 filament_diameter: 1.750 heater_pin: PA1 sensor_type: EPCOS 100K B57560G104F sensor_pin: PC5 control: pid pressure_advance:0.02 pressure_advance_smooth_time:0.035 pid_Kp=24.522 pid_Ki=1.397 pid_Kd=107.590 min_temp: 0 max_temp: 305 min_extrude_temp: 150 [tmc2209 extruder] uart_pin: PC14 run_current: 0.6 uart_address:3 #hold_current: 0.5 interpolate: True stealthchop_threshold: 400 [heater_bed] heater_pin: PA2 sensor_type: EPCOS 100K B57560G104F sensor_pin: PC4 control: pid # tuned for stock hardware with 50 degree Celsius target pid_Kp: 54.027 pid_Ki: 0.770 pid_Kd: 948.182 min_temp: 0 max_temp: 105 [probe] pin:PB1 x_offset:27 y_offset:-20 [safe_z_home] home_xy_position: 85,137 speed: 100 z_hop: 3 # Move up 5mm z_hop_speed: 6 ################################################# #bed mesh calibrate ################################################# [bed_mesh] speed:200 horizontal_move_z:5 mesh_min:27,12 mesh_max:210,205 probe_count:5,5 algorithm: bicubic bicubic_tension: 0.3 fade_start: 0.2 fade_end: 10 mesh_pps:4,4 move_check_distance: 3 #split_delta_z: .025 [fan] pin:PA0 [input_shaper] shaper_type_x = 2hump_ei shaper_freq_x = 43.8 shaper_type_y = 2hump_ei shaper_freq_y = 41.8 damping_ratio_x: 0.1 damping_ratio_y: 0.09 [gcode_macro PRINT_START] gcode: SAVE_VARIABLE VARIABLE=was_interrupted VALUE=True [gcode_macro PRINT_END] gcode: SAVE_VARIABLE VARIABLE=was_interrupted VALUE=False RUN_SHELL_COMMAND CMD=clear_plr clear_last_file [include printer_additions/___module_loader.cfg] #*# <---------------------- SAVE_CONFIG ----------------------> #*# DO NOT EDIT THIS BLOCK OR BELOW. The contents are auto-generated. #*# #*# [probe] #*# z_offset = 0.5 #*#
-
Pad sovol 32g
apprendista ha risposto a apprendista nella discussione Software di slicing, firmware e GCode
Mangio un boccone e ripasso tutto dall'inizio, non capisco anche se metto è in inglese molte scritte me le dà in italiano come stampante invece di printer -
Pad sovol 32g
apprendista ha risposto a apprendista nella discussione Software di slicing, firmware e GCode
-
Pad sovol 32g
apprendista ha risposto a apprendista nella discussione Software di slicing, firmware e GCode
Si ricontrollo ma si ho seguito il video di gergo print 3d
-
Pad sovol 32g
apprendista ha risposto a apprendista nella discussione Software di slicing, firmware e GCode
Come aggiorno il firmware alla stampante ? Sicuramente è questo il punto principale adesso dovrò mi fermo .
-
Pad sovol 32g
apprendista ha risposto a apprendista nella discussione Software di slicing, firmware e GCode
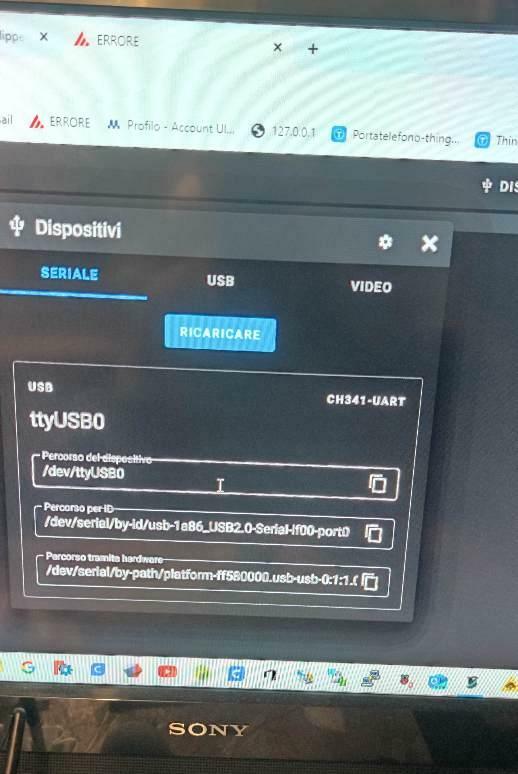
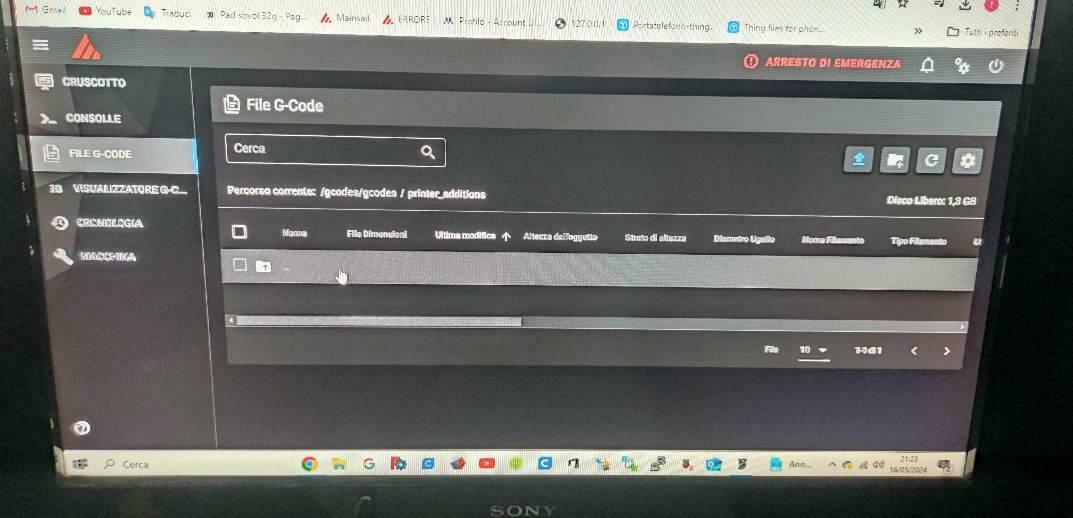
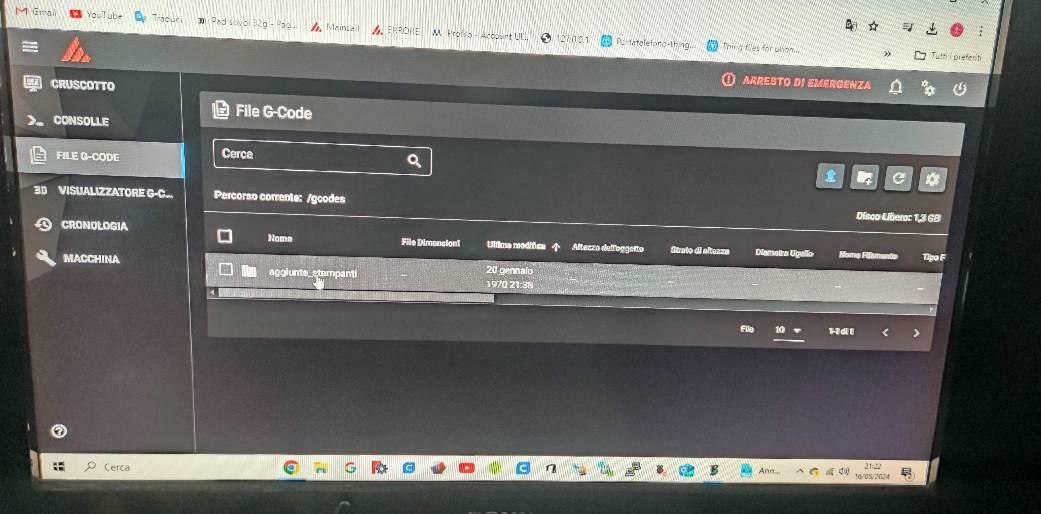
Con orca slicer al punto del wifi . Selezionando octoprint/klipper mi dà questo messaggio e non si collega. Con mainsail ho creato la cartella e ho provato mi dava scaricati ma aprendo è vuota .
-
Pad sovol 32g
apprendista ha risposto a apprendista nella discussione Software di slicing, firmware e GCode
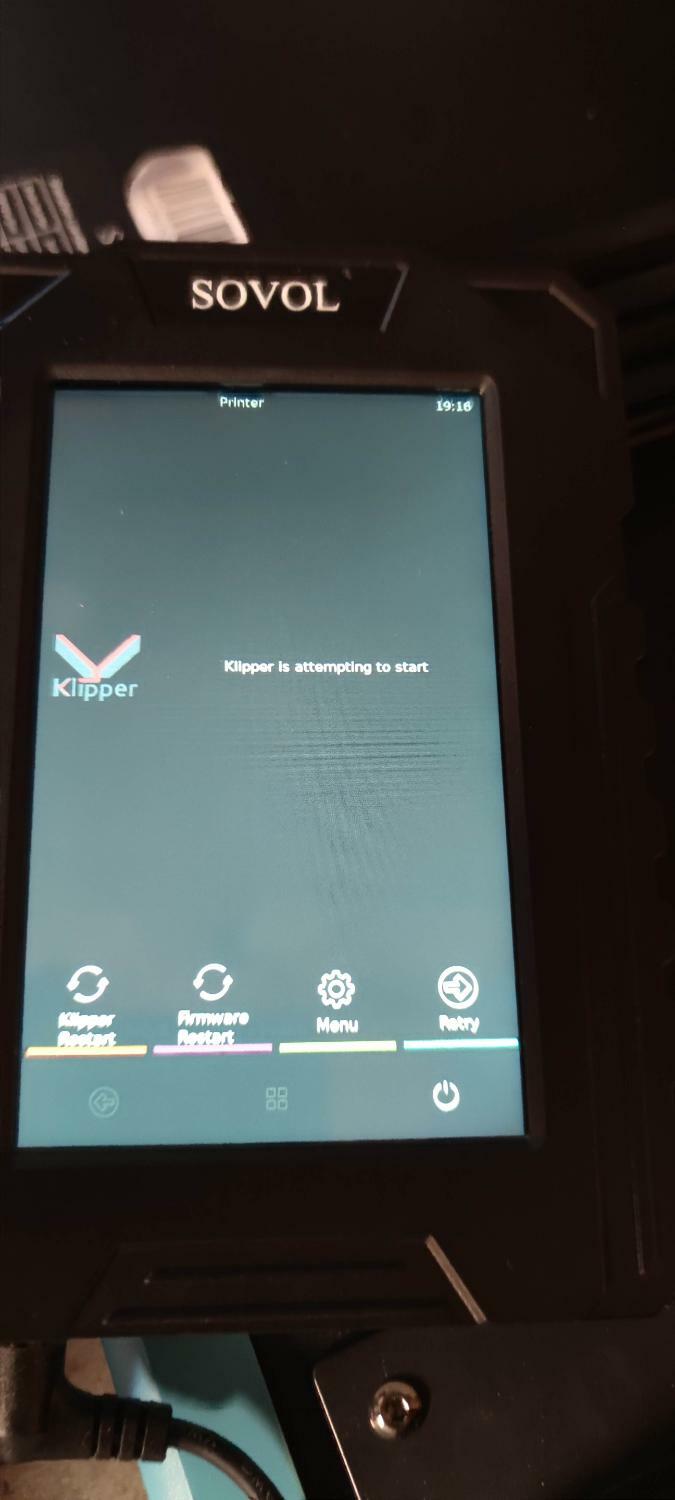
ho scaricato il firmware in tre modi diversi, alla fine ho usato quello compresso, lo ho decompresso in una nuova cartella sul desktop, ho inserito la emmc con adattatore nel pc e usando balena flesciato il firmware sulla emmc; collegato dalla stampane il cavetto dell'alimentazione e ho acceso stampante e il pad si è acceso di seguito; impostata la lingua ed ora ... cosa devo fare ? È normale che ogni volta che accendo il pad fa la striscia di scritte-controlli ? -
Pad sovol 32g
apprendista ha risposto a apprendista nella discussione Software di slicing, firmware e GCode
Sperando che riesca a fare andare tutto liscio , intanto ti rie ringrazio ancora e farò sapere come andrà ? 💪A presto -
Pad sovol 32g
apprendista ha risposto a apprendista nella discussione Software di slicing, firmware e GCode
Chiedevo perché il pad sovol dell'sv07+ non ha porte per SD ma aprendolo ha una orta type c in testa nascosta con la cover con sui scritto download. Proverò e farò sapere. Intanto ti ringrazio. La emmc 32g non è sovol e la prima volta che l'ho inserita mi ha dato la schermata credo klipper generico credo, se non ricorso male nella eMMC ci sono due partizioni, le devo formatrare tutte e due prima di fare il flash? P.s. il portatile e il PC che uso sono un po' datati e non veloci alcune volte non capisco se è andato male qualcosa o non ha fatto il suo tempo. -
Pad sovol 32g
apprendista ha risposto a apprendista nella discussione Software di slicing, firmware e GCode
Appena rientro provo. Devo scaricare ciò che mi diranno di scaricare nel link e usando balena metterla in una penna USb o metterla nella emmc ? Poi accendo senza collegare la stampante ? Se ora la scarmata è nera non è connessa ne al wifi ne a mensail . Per fare le verifiche del download non, ho letto tanto ma non ho capito ancora come farlo, perché molte volte, anche scaricando dal sito sovol, balena mi dà il messaggio che il file, se non erro, non un IMG e che non verra letto. E per il printer addome lo devo aggiungere dopo ? Quando collegherò mainseal al pad via ssh si può usare la linea su mainseil? -
Pad sovol 32g
apprendista ha risposto a apprendista nella discussione Software di slicing, firmware e GCode
Devo usare balena per metterlo sulla emmc 32 ? Ho provato con la vecchia emmc e mi ha dato problemi, mi sono informato su tante cose ma all'atto pratico non capisco perché ci sono tanti intoppi. Dovrei cercare il firmware originale ? Ho provato a scaricarlo dal dito sovol ma anche lì problemi È per una sovol 7plus -
Hi, I changed the emmc 32g for the original sovol pad because the original didn't work but now I can't get it to work, it stays black screen. What procedure should I do? Help me
-
Salve a tutti sono Apprendista di nome e di fatto, oltre a un grande aiuto chiedevo se c'è ual uno su Roma che mi potesse aiutare con klipper e un pad .grazie a presto.
-
- 1
-

-
Salve a tutti sono nuovo e mi scuso se non sono chiaro;ho una ender-2pro e vorrei metterci il touch della Ender3 s1 pro che mi è rimasto inutilizzato. Vorrei chiedervi se et possibile utilizzarlo con la Ender 2-pro e come .
-
Salve a tutti sono nuovo e mi scuso se non sono chiaro;ho una ender-2pro e vorrei metterci il display touch della Ender3 s1 pro che mi è rimasto inutilizzato. Vorrei chiedervi se è possibile utilizzarlo con la Ender 2-pro e come .